navbar

about me wish list contact pr Image Map
Showing posts with label nail art. Show all posts

6.5.14

NOTD: Expect the Unexpected

Hi Everyone,

It feels weird being back on Truly Polished, recently I've pretty much forgotten that I even have a blog! I've decided there will be no more reasons behind me not blogging, either I do it or I don't do it... At this point I'm just counting getting dressed in the mornings as a win! I'm 24 weeks pregnant today and getting round two of horrendous tiredness, plus my son is ill today so I've had the worst sleep, he came into bed with me at 4am and was so boiling hot hanging around my neck for cuddles that I didn't sleep well at all!

I was surprised, then, that when I woke up, I was itching to some nail art... When we got up this morning, my son was desperate to go to preschool, and seeing as his temperature didn't feel too high then and he seemed happy, I took him in and came home brimming with ideas!

A few weeks ago we found out we are expecting another boy, so I knew I wanted to incorporate blue into the theme, and I knew I didn't have the energy for anything but striping tape, so I set about raiding my stash and here's how it turned out...

Natural light
Flash

The polishes I used were:

Sally Hansen - Lavender Cloud, a very pale off-white purple
Models Own - Blueberry Muffin, a pale blue creme
Models Own - Champagne, a champagne gold foil
Models Own - Southern Lights, a blue toned holographic full coverage glitter in a slightly tinted purple base.

I used striping tape for all of the sections, and finished it with a coat of HK Girl top coat.

I'm really pleased with how this came out, it was very simple to do and was a great first foray back into nail art. The only thing I'd add would be a blue triangle on my middle finger nail just to balance the colours a bit better, I love he subtle difference between the blue and off-white so I'd have like to see more of that.


What do you guys think?

9.9.13

Inspired By... #1

Hi Guys,

Hope you all had a good week last week and a good weekend! I was so busy last week, out pretty much every day, then my nephew had a little birthday party yesterday because he turns two today. So today I've been trying to catch up with housework! I hate having to tidy up and clean, it's so mundane, but has to be done unfortunately... I just can't wait to get into bed tonight! 

Tonight I have something that will hopefully turn into a regular feature: Inspired By...

Recently I bought a new phone case from TKMaxx and as soon as I bought it I knew I wanted to do some nail art inspired by it. The polishes I used here were Snow Me White by Sinful Colors and Barry M Gold Foil.

I started off with a white base coat and let that dry completely, and then I marked off chevrons with striping tape. Next I applied one coat of gold and then peeled off the striping tape while the nail was still wet.

Here is the result:

Natural light
Slightly different shade of gold but still looks nice...
I had to include this, my brother text me just as I was taking this photo!

You can get Barry M Gold Foil at pretty much every Boots and Superdrug, it's definitely worth having. Sinful Colors is available at selected Boots stores.

If you like the look of this phone case, I've seen it in a couple of TKMaxx stores, it is made by Agent18 and they usually retail at around the $30 mark, but they sell them for £6.99. This is for the iPhone 5.

Right, that's all from me for this evening. I'm going to quickly experiment with a Slimming World cake and then it's time for bed!

See you next time!

27.8.13

NOTD: Abstract Neons feat. Models Own

Hi Guys,

Before I start, I have something to say... How great is Celebrity Big Brother this year???? I haven't watched the normal one in a few years and just caught the odd episode of the celebrity version, but this year they've stepped it up a notch and I actually knew who most of them were! Only Ron and Danielle I hadn't heard of, so I'm really enjoying it!

Anyway...

Tonight I have a NOTD look for you. I wore this up until yesterday and loved every minute of it! I swatched my KIKO haul and ended up with a bit of blue staining around my cuticles so I wanted to wear something nude. I chose My Vampire is Buff, and after a day I felt like I needed to jazz it up, and this happened! 

I used Models Own Bubblegum, Pink Punch and Pukka Purple. Originally I had only used the pink and the coral, but I decided it needed a bit of something extra so I added the purple and I liked it a lot more this way. I got a lot of compliments on this manicure when I was wearing it, and it was very easy to do, which is a bonus!

Natural light
Flash

The first shot!


This manicure was very popular on Instagram, as well as Models Own sharing it via Twitter and Facebook and a few people have asked me for a tutorial. I am aiming to have one done by the end of the week BUT I cut off the corner of my index finger nail on Saturday while chopping onions, so if I can figure out a way for that not to show, the tutorial is a go, otherwise it might have to be next week! Models Own said they thought this would look great in a monochrome colour scheme and I agree, so I'm armed with greys!

I'm hoping to get back into regular posting now, I have a huge list of things I want/need to post, so I need to get on with it... My problems are: a) I don't like iPhoto and yet my camera won't mount normally so I have to import them and faff about, so it's a bit annoying to have that to look forward to! and b) I'm addicted to TV... When my boyfriend is away and my son is in bed I just don't move from the sofa... I've been watching Twisted, which I love, and I've started watching The Vineyard which I don't really like, but I can't help myself with reality TV!

So bear with me and I'll be back soon with more!

5.6.13

Sugar Spun Nails Tutorial

Hi Guys,

I feel like a stranger to this blog now! I really thought I was back in the swing of things with blogging and then it all went horribly wrong. I was exhausted when I got back from Holland the Friday before last and then I got literally no days notice on the Sunday that my boyfriend was coming home! He called me at half past 8 in the morning saying he would be home at half past ten that night, so I had to book a hotel at Heathrow and rush down there! Since he got back we have been so busy! I'll post a My Week In Pictures later this week to let you all know what I've been up to!

Anyway, onto my first polish post in what seems like a while. I actually put this tutorial together when I was in Holland, but finding the time to edit the photos was like trying to find time to run a marathon lately!

I have wanted to try sugar spun nails for ages, and I finally decided to take the plunge with my new Sinful Colors goodies!

Here is what I used:

Snow Me White, Cinderella, Easy Going, foil, and a tooth pick


I started off with a white base, and then picked my first colour, which was Easy Going (pale pink creme). I put a large blob of polish onto the foil and stirred it for a while with the tooth pick until it became thick and a bit gloopy. I waited until it looked like the photo below:

Sorry for the blurry picture - I only have one dominant hand and did everything myself!


Once it was thick enough I put my nail next to it and dragged strands of polish over my nail. I repeated the process until I was happy with the look and then carried on with the blue, doing the same thing.

Here is a little step by step pictorial! If I had a better camera I would have made a video tutorial... Maybe soon, I'm getting a Nikon DSLR for my birthday so I could try then!


Hope you enjoyed this little tutorial... See you back here soon for my Week In Pictures, my Five Favourites post from May and a beauty tag that I was tagged in! Also, I'll have some swatches of my new Sinful Colors pretties, as well as some other bits and pieces. I have two really pretty summer ideas for nail art, so I'm hoping to have time to do those... Honestly all my spare time is going into our house at the moment, and I'm in my 3rd week of the Insanity workout, so that's taking about an hour of my day too...

Goodnight (or good morning, depending on how you look at it- it's past 1am!)

14.2.13

Happy Valentine's Day!

Hi Guys,

Long time no see? I know, I'm a terrible blogger! This week we have been doing lots of boring things around the house, but we're getting somewhere. My son's room is nearly finished. His blinds are cut to size and put up, his normal ceiling light has been taken down and there is a sun in it's place, and his room is coming together exactly how I wanted it to! I also organised my Helmer on Tuesday... There will be a post on that either tomorrow or next week, time depending...

Anyway, today is Valentine's Day, not that you would know it in my house! Let's just say we aren't all pink hearts and love songs here!

Nevertheless, this is Valentine's Day and I wanted to mark it with a pretty pink manicure. This is the first manicure that I have photographed in my new lightbox. I got it on Monday, and while I was playing with it I knocked over one of the lamps and the bulbs went. So I bought new bulbs and replaced both, so I hope you like the new photos!

Here's the mani:


Let me just say, it felt really good to do a little bit of nail art, even if it was just a little bit!

The polishes I used were: 

17 Simply Pink - three coats (pale pink)
Revlon Sparkling - one coat (glitter)
Orly Miss Conduct - two coats (cranberry scattered holo)


I freehanded the heart as best as I could with the brush from the bottle, and then at the left hand side I used my opposite thumb nail to create the line. Then I filled the gap with Simply Pink with a striping brush.

I love how this looks, it's the first thing like this I've done in absolutely ages!

What do you think of the lightbox photos? I'm really happy with them, the bulbs give off the perfect level of light. The only thing I must say is that I didn't use a matte top coat. This was glossy (I used the Models Own topcoat) but the diffused light takes the glossiness away. I don't mind how it looks, but it's worth a mention!

If you want to know more about my lightbox and lamps, then check back next week because I'll hopefully have a post up about it!

Happy Valentine's Day. Whether you're single, in a relationship, or "it's complicated" I hope you're having a great day!

15.10.12

NOTW: Models Own Tape Mani

Hi Guys,

I made it out alive after the party! It went really well, I was so pleased with how everything went. My son really seemed to enjoy it and he was spoiled rotten bless him!

Today we've just been packing the last bits, our ferry leaves at half past ten this evening to Holland. We've got a little cabin so we can sleep until we get there at half past six tomorrow morning. I can't wait to see my Dad, and I can't wait to show my boyfriend around Groningen. My Dad has lived over there since 2004 and until I was about 18 I used to spend a month there each summer and go over there for all of my holidays, so I know the place really well, it's almost like a second home to me!

Today I have a Nails Of The Week post. Most of my swatches are done in quick succession, but if I do a nice manicure, I like to keep it on for as long as possible. I did these nails on Tuesday and I love them! Everything is from Models Own and I bought the polishes in the half price sale they had a week and a half or so ago.

I used Aciiied on my thumb, index finger, and pinkie and Tangerine Queen on my middle and ring fingers. Aciiied is a chartreuse creme and is the definition of ugly/pretty! In fact, chartreuse is my least favourite colour in the world. When I was a child, there was a Crayola crayon called Spring Green that I hated so much that I never used... And on a separate note, I'm only realising now as an adult that crayons smell terrible... But back to the crayon, here it is:

Photo from Google

Anyway, onto my mani! I painted my fingers as I said above, then I used some striping tape (£2.19 for 12 rolls) to mark out zig zags on my nails. I then used Models Own In the Navy to go over my whole nail. One coat was enough, and then I carefully peeled off the tape to reveal neon lines. It's worth mentioning that I painted on Aciiied and Tangerine Queen yesterday so the polish was totally dry. If you're doing this in one go, use quick dry topcoat and leave it around 20 minutes before doing the tape part!

Here's what it looked like:


Doesn't it look cool? I'm really pleased with how it turned out.

All polishes retail for £5 on the Models Own site but I got them for £2.50 each during the sale.

30.7.12

NOTW(E) - Peacock Gradient

Hi Everyone,

I hope you all had a lovely weekend! I mentioned on Friday that I was going to visit a friend, and I had a lot of fun there. A couple of friends were celebrating their birthdays and there was a fancy dress theme: Ibiza Zoo Project. If you haven't heard of Zoo Project, it's a club night in Ibiza that involves animal fancy dress which is generally just face and body paint! 

Now face painting, makeup, etc are not my thing. I can do nails, but anything involving my face is really not my forte! Luckily, one of my mummy friends is a professional makeup artist and she jumped at the chance to do my makeup. We settled on peacock makeup and had a trial on Friday. Then Saturday morning she did the real thing, sealed it with fixing spray and off I went!

But I couldn't NOT do my nails to match! I wanted to try another gradient, so I chose Rimmel Sky High, which is a bright turquoise colour, and Models Own Gold Rush, which is a gold foil with a glass fleck appearance. I used my normal method (the Nailasaurus method) and I was really happy with the result! Cleanup was a nightmare for this, it took me about two hours to clean up and I still wasn't happy with it, but it was 2:30am and I needed sleep before going out!

One of my followers on Instagram suggested putting Vaseline on my fingers before doing my gradient to minimise how much polish goes onto my fingers. She also suggested taping them beforehand. Has anybody else used these methods? Do they work?

Here it is! After I did the gradient I had to dab on a bit of extra gold because the two polishes I used weren't equal in terms of coverage. I also put on two very thick layers of Seche Vite to even out the texture. Please mind the messy cuticles!

Beautiful gradient!

Just in case you were wondering, here's what my makeup looked like all finished! Kellie did an amazing job! After my trial I got complimented in Superdrug by the sales assistant, and then on Saturday a lady stopped and told me how nice it looked! A lot of people stared though, I guess it's not every day they see a girl walking around with a huge peacock feather drawn on her face!

Me! Look how well my nails match!

If you're thinking that my outfit looks familiar, that's the playsuit I featured in my £100 ASOS Blogger Challenge post. I have a lot of time for ASOS, and this playsuit only cost £18, how could I turn it down?!

I hope you liked my latest gradient. They're making me so happy at the moment, all I can think of is what colours I can put together next!

Don't forget about my giveaway! If you haven't entered already, you can do so here. You still have 18 days to enter, by which time I think the Olympics will be finished (I have no idea...!) but I want to make sure people have enough time to enter!

See you back here tomorrow, when it'll be time for my second edition of Five Favourites! 

23.7.12

Gradient Nails and Guest Posting

Hi everyone,

Did you all have a good weekend? I spent most of mine with my brother, we went shopping, out for lunch and just hung out at my house, so it was nice. Also, the weather got better yesterday at last! It's been raining every day for weeks now so to have a bit of sun has been amazing. 

Today was so hot and sunny, while my son was asleep I laid out and actually had some pretty decent tan lines after an hour. During the winter I always hate the fact that I have olive skin because it looks awful without a tan... I look at everyone else with their pale pink skin and hate my washed out yellowy face! But in the summer I love my half-Arabic genes, I can be out in the sun for 10 minutes and catch the sun. Don't get me wrong, it has its downfalls... If I'm wearing a vest and forget to tuck the straps in, I have strap marks forever until they even out!

Anyway, onto the polish! I have a gradient manicure to show you. I actually did this for my guest post over at Island Girl Insights (you can see that here) but I love it so much I have to post it here too!

I used MUA Shades 12, Wet'n'Wild White, Revlon Girly, along with a sponge. It's the normal big yellow one I use for everything, it's a car washing sponge from ASDA and I bought it for 50p.

The method I used for the gradient was the one that The Nailasaurus posted here, but I started with a white base. Mainly because the polishes I used had different finishes, so I wanted to make sure they both popped, rather than painting my whole nail with one colour first, in case I could see it underneath, if that makes sense!

Here is the result, I used two coats of Seche Vite on top!


I was so in love with this mani that I wore it for four days. The only reason I took it off was because I had to finish the other half of my guest post. I do two manicures for under £5 and this was the first one I did.

I hope you liked my gradient mani! Over the past couple of months I've had some unsuccessful gradient attempts but I think this was a real success! 

See you tomorrow!

2.6.12

Jubilee Manicure!

Hi guys,

It's a bit of a late post from me tonight, I went out for a lovely meal with my boyfriend. His parents looked after our son and it was lovely to have a bit of time off. If you're from the UK you'll know today is the first day of a four day weekend, and if you're not British, you might have heard something about the Jubilee, or you might not! Today is the first day of the celebration of the Queen being on the throne for 60 years! We get a four day weekend this weekend, so everybody is in the party mood.

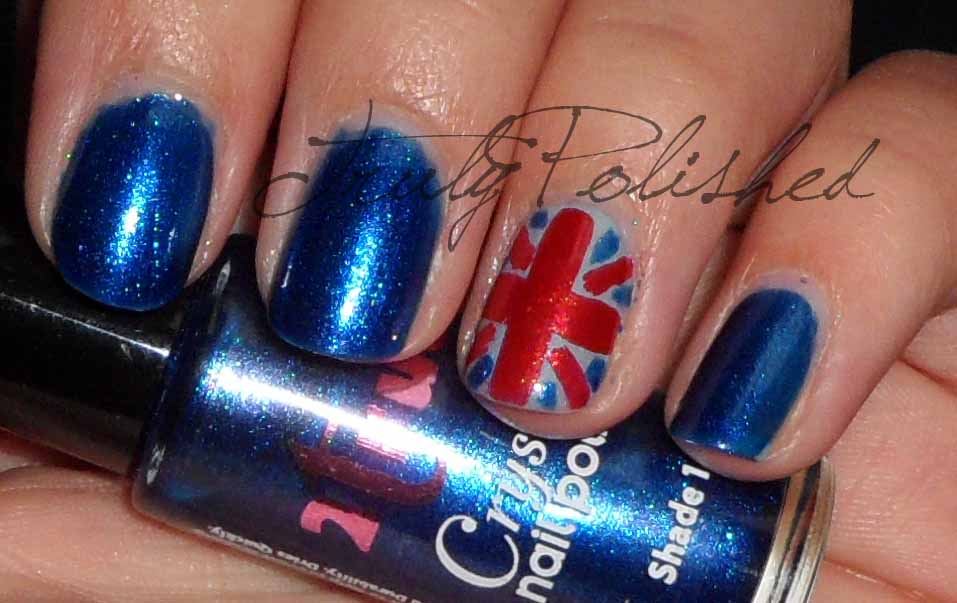
I'm not really a Royalist, but I'm all for celebrating, so I thought I'd plan a subtle nod to the Queen. I'm not great at nail art, so I couldn't do anything too elaborate. I settled on a Union Jack accent nail!

The polishes I used for this were: China Glaze Sea Spray (it's the closest thing to white I have with me!) and 2true shades 1 and 2 for the blue and red. I painted on one coat of Sea Spray, then did the red cross and diagonal lines, then put a little bit of blue in the corners. 

I'll have full reviews of the 2true shades probably next week. They're both highly pigmented shimmer polishes that have a glass fleck effect. They're so pretty and cover perfectly in two coats.

Here's the outcome of my manicure:

Natural light
Flash
Macro, look at that shimmer!


I was so pleased with how this turned out, despite my lack of nail art skills! Hope you like it too!

27.5.12

Haul time & NOTD

Hi guys,

I'm still having problems with my camera today... I've downloaded some data recovery programs so hopefully I'll be able to get my photos back...

This means I haven't got a polish to show you, but I do have a little haul post! I bought some Nails Inc last week from TKMaxx, if you haven't been into your local store lately, have a look, they've got a ton of Barielle, Nails Inc, Color Club and Barielle in there at the moment! 

This week I bought a few 2true limited edition shades and a couple of polishes from H&M too. So here you go! I'm so sorry for the photo quality, the photo was taken with my boyfriend's iPhone. My camera is currently plugged into the laptop scanning for lost photos!

Haul

I've swatched a couple of the Nails Inc polishes already and posted them but I still have a lot to do as you can see! I also can't wait to wear the yellow polish. I've been looking for a mustardy yellow colour for a while and Lemon Tree from H&M was perfect! And it was only £2.99! 

The 2true polishes I bought were so cheap, I think I got three for £4.00 or something and I'm really pleased with them. I'll be swatching them soon if my camera ever decides to like me!

I bought the matte topcoat because I've wanted to get one for a while. I keep seeing really cool looking nail art designs online combining matte and glossy polishes and I've wanted to try it out. I thought tonight would be a good time and so I used Nails Inc Park Walk which is a very bright pink. I painted it on all my nails (it was almost opaque at one coat - perfect at two) then added the matte topcoat. Once I was happy with it, I used NYC Colors In a New York Minute Grand Central Station (a clear topcoat) to paint on curved stripes on my chosen accent nail - my ring finger. I was so pleased with this! 

Here's a photo, this was taken on Instagram with my iPad, so the colour is a bit off!

Nail Art


I'm really hopeful that tomorrow I'll have a pretty polish to show you with proper photos, so fingers crossed that my camera works properly again as of then!

On a side note, I'm up to 26 followers now, so only four away from my giveaway!

8.4.12

Easter Egg Nails

Happy Easter Everyone!

Sorry I'm posting so late today, I've been so busy!

I felt like doing some nail art so I've got a really pretty Easter manicure to show you that I did earlier. I've seen so many Easter egg manicures online recently and it inspired me to try and recreate them! I actually did this last night but it got messed up and dented overnight while I was sleeping so I had to redo it!

The polishes I used from thumb to little finger were:

Left hand: Essie Absolutely Shore, MUA Shade 9 blue, Essie Navigate Her, 17 Supreme Shine Simply Pink, NYC Colors Lexington Yellow.

Right hand: Rimmel Lycra Pro Aqua Cool, Essie Tour de Finance, Oh My GOSH Baby Blue, Rimmel Lycra Pro Peppermint, BeautyUK Smokey Lilac.

I painted each nail with my chosen colour (ten in total) and then took a ziploc bag and dropped one drop of the first nail polish onto it. Because I don't have a dotting tool I used the end of a biro pen to pick up a bit of polish and dot it onto all of the nails that didn't have that colour painted on them. I repeated this for every colour until I had done all ten, then added a layer of Seche Vite and this is what I ended up with, hope you like it!

The picture of my left hand was taken in the shade and my right hand in more direct sunlight. The sunlight picture was the only one that showed a difference between the baby blue and peppermint polishes on my middle and ring finger!

Left Hand

Right Hand
Hope you like my nail art! Enjoy the rest of your bank holiday weekend!

14.3.12

Seven Nation Army Manicure!

Hi guys,

Today I was thinking about how I could paint my nails. I wanted to do some nail art, mostly because the thought of taking off my franken from yesterday broke my heart! So I thought about it for a while, turned on MTV and thought some more. Then all of sudden Marcus Collins came on TV. For those of you who don't know, he was the runner up on X Factor. I've never been a huge fan of his, and his new single doesn't help things! It's a cover of Seven Nation Army by the White Stripes. I use the term "cover" loosely as the song as barely recognisable now it has more or less a reggae accompaniment! 

I found the song so offensive to my ears that I muted the TV, got onto YouTube and listened to the real version. Seven Nation Army is one of my all time favourite songs, so after listening a few times and dancing round the room with my son, I set about trying to recreate the video on my nails!

I used plain sellotape for this mani, but it took so long to cut etc that I gave up and did my last 2 fingers freehand. Now I wish I'd used the tape for all of them!

The polishes I used were: Rimmel Black Out and my own Star Nursery franken topcoat (see yesterday's post), then the white is a Wet'n'Wild polish, it doesn't have a name... The red polish is Rimmel's 60 Second in Rapid Ruby. I used the Konad M44 image plate for the lines. It's the image plate that has different tips for more original french manicures.

Outside in the "sun," it wasn't very bright!
I really love this mani, I just wish I'd taken more time to do the tape! But I think it's a fitting tribute to the song, after all, I doubt Jack White would criticise me for a bit of a mess!

Inside in the natural light

Just for good measure, here's the inspiration for this manicure! The White Stripes - Seven Nation Army